|
|
 |
 |
|
|
|
 |
|
|
|
|
The current design is H139b. The design changes from the previous version are:
- Completely reworked the layout and placement of the two main modules and how the garage is connected. The H139a version was a failure (no you dont get to see it), but then H139b worked out. This design does pull some ideas back in from the H137 series, but since the garage is on the opposite side, its not the same.
- This design was optimized for south solar gain and now meets the window requirement of Oregons passive solar design rebate. It was also optimized for views, including the best view being visible from the office.
- Major changes:
- The second module was moved from north of the main module to east of it.
- Both bedrooms now face south with a view of the Three Sisters range.
- The master bedroom is now in the second module and the guest bedroom is in the main module. I can sleep better.
I also control that bedroom and since it is the closest to the studio now, that too is better.
- The master bedroom has a very small toilet closet, and a sink; that is all. It also has is a separate door into
the main bathroom.
- Since the garage does not need to be accessed from the second module, there is no need for a hallway the
full length of the module. Thus, the hallway is cut short and the extra space is allocated to the master bedroom.
- Since the studio now ends against dirt instead of a common wall, the extra end double drywall is removed. The
hallway double drywall remains.
- There is still the middle section where the dirt comes down between the middle retaining walls.
- The main module has been rearranged for traffic flow.
- The office now faces west and has a full view of Mount Jefferson.
- The kitchen is no longer bounded on both sides by walls, and thus again visually benefits from being bumped
out of the module.
- The garage is now connected to the house by way of an extension of the front window wall. This is very open
visually and is significantly better than the old way.
- The garage is more north and out of the way than the previous designs retaining wall, which gives better views
from the inside.
- Note that now the house and garage have a courtyard in front of them, and to the back a larger corner area
for the dirt run out which could be used for the buried heat pump pipes (if that option is used).
- The rotational angle from due North is now 25 degrees, up from 10. This really improves the overall view from
various points inside (view the site files for H139b.1), and is still within Oregons passive solar limit of
30 degrees from due South.
- Switching the second bedroom from the west side to the south side made a significant change in the
prescriptive formula for getting the south square feet component up compared to the rest of the house.
- There are now two sides of the house which are earth bermed instead of just one. To me this is a significant
improvement... why have an earth sheltered house constructed if it isnt that much sheltered? Basically the
garage buffer was traded out for the earth sheltering.
H139b.2 - H139b.17:
- [H139b.2] Reworked BR1 (Master bedroom) to provide a more regular shape:
- The toilet closet does not stick out now.
- This actually resulted in the toilet/sink narrow room similar to previous designs, except that it now also opens
into the main bathroom.
- The mobile closet dimensions were adjusted for the change in wall spacing.
- There is space for a vanity and 6 of wall cupboards.
- I also managed to get the toilets against the module wall instead of in the middle of the module.
- Less venting required mid-module (visible from the hallway).
- [H139b.2] Added 6 more feet of wall cabinets in the main module, and floor to ceiling server room cabinets in the wall space freed up by the previous adjustment of the server room and vault room doors.
- [H139b.2] Found an error (another Excel thing) in the passive solar calculations for H139b.1. To fix it, BR1s window had to be increased to the maximum possible (10-6). This puts the east retaining wall right on the end of the module.
- [H139b.2] Added floor vents to the main module, they already were in the other one. I also specced one in the kennel area for the house exhaust to run through on its way out.
- [H139b.3] John wanted the garage more inline with the house, not sticking out like a sore thumb.
- [H139b.4] Compromise between b.2 and b.3. Better use of space. Still sticks out a bit though.
- [H139b.5] Better layout from b.4.
- Overall, much less wall to build than b.3, but just as inline for the garage (with the house).
- Garage had to be lengthened just a bit.
- This assumes that EST can do the parapet walls on top of the kitchen bumpout (see pictures).
- Note: they said they could.
- Garage has room for parking, work area, mini-gym, rec area (move out vehicles).
- Drawback - not as much dirt around main module (more garage buffer again).
- [H139b.6] Johns version, not published.
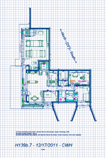
- [H139b.7] Bring bumpout in 1" (8'-6" total) to align the front garage wall properly with the overhang based upon 6 VOBB increments.
- [H139b.7] Fixed alignment of north retaining wall off of the garage:
- Fixed garage wall to be 10" wide, no VOBB pilasters, assuming EST will construct that wall (Jeff still needs
to get back to me on cost estimate).
- Adjust retaining wall to be off of the outside of the 10" garage wall wall for 4', etc.
- [H139b.7] John wanted the 4 high front EST parapet wall to continue across the garage:
- Build a facade parapet to connect with the real one.
- Instead, I just increased the height of the VOBB front and side garage walls from 9 to 12, and increased
the height of the north retaining wall to match.
- [H139b.7] Garage roof to show slope direction and amount:
- Even though John said you could drain out from behind the garage parapet wall, I put in a garage roof which
basically drains in one direction: front to back.
- A multi-point roof is required because of the kitchen bump out and run downs from 12 to 9 along the side
and back walls. The heights are shown at different control points.
- [H139b.7] John had put longer windows in H139b.6, but he covered the middle part in the process:
- The electric garage door opener needs wall space to be mounted above the midpoint of the garage door
on the inside wall.
- I had put the outside flood lights for the garage on the opposite side of that since there was wall space.
- As a compromise, I made the existing 4 clerestory windows wide like Johns, but left out his middle one.
- [H139b.16...]
- Various versions from different sources, and my revisions of ESTs footing plan. See the Submittal Set page.
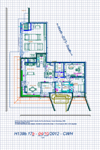
- [H139b.17] The jump in numbers is due to receiving several versions from John, as well as a few from other sources. A lot of small changes:
- A BRAND NEW fully layered PDF file is now available!
- John came up with a much better and simpler garage roof, multi-point is out.
- Added in the sun shade. TANGENT(20)=0.3639702343.
- 37'-8"/42'-0" west side (14x).
- 27'-10"/30'-0" south side (10x).
- Master bedroom 11'-0"/15'-4.5" (5x).
- Struts and cables.
- Made changes:
- North garage wall concrete slopes:
- 11'-6" roof bottom @ front to 9'-0" @ back over 25'-0".
- North EST wall 16'-8" prior to north RW (exactly 2/3).
- Rest of north garage wall 8'-4" to roof front (6" in from facade face), exactly 1/3.
- Slope: +30" at front, +20" behind north RW, +0" at rear.
- Garage roof: update per John's latest version.
- Put in major cricket.
- Small cricket/flashing needed where VOBB meets north RW?
- Airlock: adjusted 2" trim, etc.
- Review RW kink, placement, etc.
- North garage RW adjusted for visual.
- South RWs & overhang mismatch.
- Jeff to give final ok.
- Shifted north garage RW east 6":
- Made room for VOBB complete corner.
- Reversed airlock doors swing due to switches location.
- Kennel dog door over 6" -> RW, outlet moved 2'-0" -> door.
- Dog door PetSafe for Pharaoh Hound sized dog.
- Exterior dog ramp added for kennel access.
- Added fencing around house/dog run.
- Adjusted plants for 10" pony walls.
- Put in balcony railings.
- Adjusted:
- Balcony railing position for lift up trim tops (access wiring).
- Hallway tube lighting (higher, position) for stairs access to balcony.
- Exterior fence gates, south side.
- Moved south planterbed light switch to other side of opening (clears china cabinet).
- Moved garage outlet 6" to clear door trim.
- Instant hot water unit in Kitchen.
- Balcony in Living Module - *Took Out*
- Looks much better without it.
- Reduced BR2 ceiling deck from 8" to 6" thickness.
- Lowered all tube light fixtures at 98" to 96" for ceiling adjustment.
- Changed cabinets to 5x@60" total, centered over upright piano.
- Master BR/Baths/Utility remain at 8" thick.
- Overhead garage door changed to 17'-10"; RO is 18'-0".
- Bathtub changed from 5' length to 6' length.
- Cabinet changed from 30" to 18" to adjust.
- Earthtube.
(1) 2137 sf * 9.64' average height = 20,601cf.
(2) 20601cf * 4 / 24 / 60 = 57.2 cfm (58 cfm).
(3a) 6" tube (6.065" NID) = 0.20063 sf (pi*r^2).
58 cfm / 0.20063 sf = 289 fpm through tube.
(3b) 8" tube (7.981" NID) = 0.34741 sf (pi*r^2).
58 cfm / 0.34741 = 167 fpm through tube.
- Still working on to allow proper cleaning/avoid mold buildup.
- Ground temp sensor tubes.
- Stainless Steel Temperature Sensor (Rugged) p/n TSENSE-SS3
- 3" long, 8mm OD.
- Copper tube: 10.0mm OD (0.394"), WT: 1.0mm, 8.0 ID
- PVC tube: 3/8" nominal: 0.675" OD, 0.473" ID
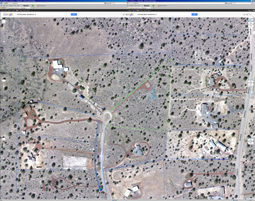
- Overlayed both floor plan and site plan files with John's to show differences --- several times.
- Recalculated Solar Statistics --- several times.
- No pictures yet, this all takes time...
|
|
![]() |
|